
UFraw

UFraw
The Unidentified Flying Raw (UFRaw) is a utility to read and manipulate raw images from digital cameras. It can be used on its own or as a Gimp plug-in. It reads raw images using Dave Coffin’s raw conversion utility – DCRaw. UFRaw supports color management workflow based on Little CMS, allowing the user to apply ICC color profiles. For Nikon users UFRaw has the advantage that it can read the camera’s tone curves. Even if you don’t own a Nikon, you can still apply a Nikon curve to your images.
UFRaw wants to give all the essential (and some non-essential) information and control over the raw conversion. With this application you can resolve almost all the exposure and white balance issues during the raw conversion. The obvious advantage is that you can make full use of the raw data. The provisional advantage is that this way we circumvent the current 8-bit limitation of the Gimp, as UFRaw does all manipulations in 16-bits.
UFraw is a great tool. There are, however, some important features which are still missing in UFRaw. These are:
- 100% Zooming
- Sharpening
- Embed EXIF data – UFRaw can save the EXIF data to JPEG output for a few supported formats. These formats include Canon (CRW, CR2), Nikon (NEF), Pentax (PEF), Samsung (PEF), Sony (SR2, ARW), Fuji (RAF) and Adobe’s DNG.
Check out the UFraw wiki page for more information.
There are several RAW image editors. Rawstudio is another one. Personally, I like to work with UFraw. It also has a plug-in for the Gimp so I can open my Canon CR2 raw files directly into the Gimp. However, I useally open them in UFraw and after editing them I open them in the Gimp. But that’s just me.
When you open your Raw images with UFraw you can adjust many things. The most important of them are the exposure, white balance and the curves. In the screenshots below you can see a before and a after situation of a Raw image. The image is a bit to dark, because the background was to light. I used the exposure, white balance and curves to to enhance this image. I also added a bit more temperature (in the white balance) and I saturated the image a bit more. The photo is a lot better now, but it’s always better to make the shot perfect so you don’t have to edit it afterwards (too much).
The UFraw interface is very easy to use and well-organized. On the left you have your editing options grouped in tabs. You can view live histograms to monitor your actions. For the more advanced photographers there is an option to import color profiles.
Important:
UFraw will save the last settings you used. When opening UFraw again with another image always be sure to put the settings back in the original positions. This behavior of UFraw is, however, convenient for editing multiple images in the same setting (composition).
Screenshots:
(Click to enlarge, opens in new window)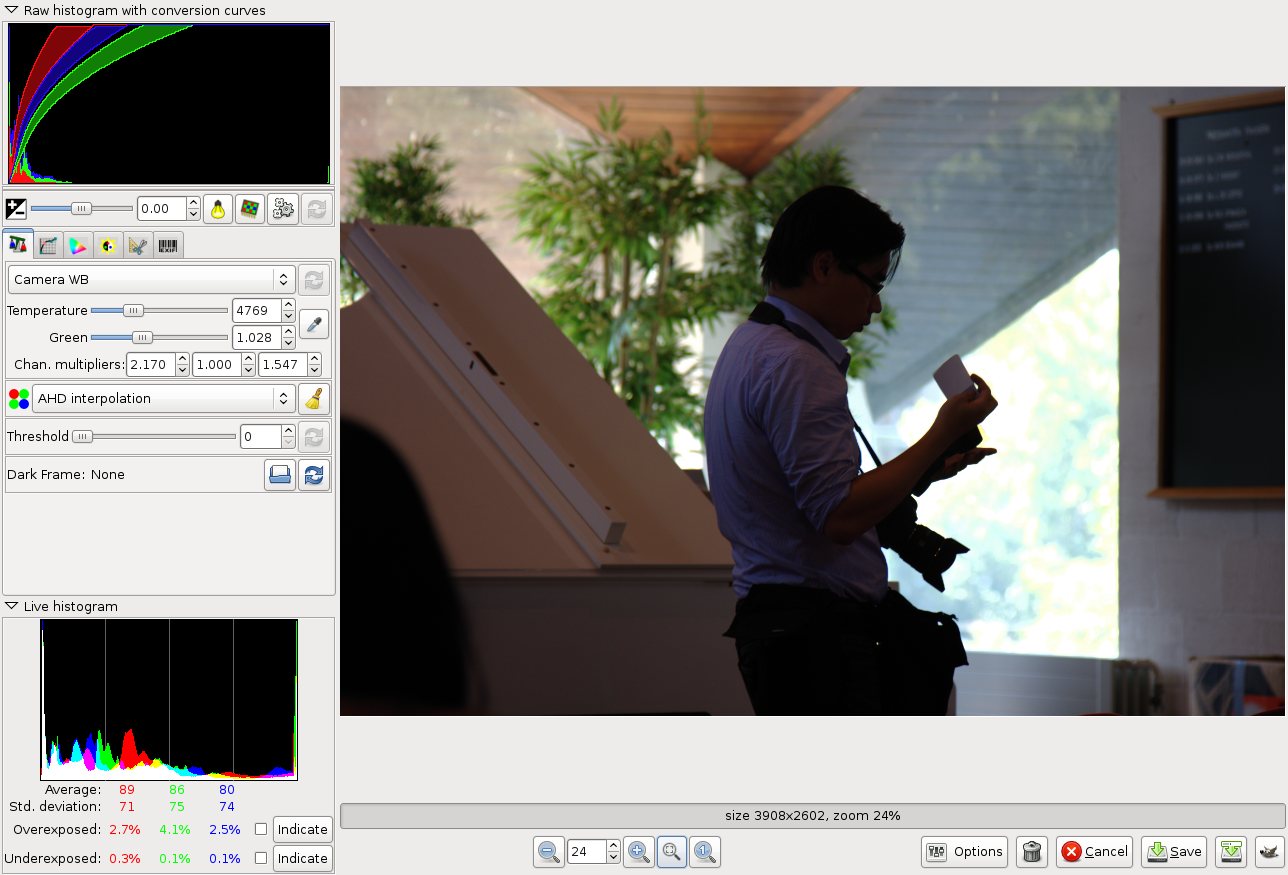

 Check out the
  When using the GIMP you have many possibilities. This can sometimes be very time consuming. You can use the build-in scripts to speed up the process. And you can extend the GIMP with the